Close

FAQs

LED FAQs

LED is short for “light emitting diode”. LEDs are electrical components that convert electrical energy directly into light through the movement of electrons through the layers of the diode material. Today, LEDs are cost effective to produce and more efficient than traditional light sources which is why they are the fastest growing technology in the lighting industry.

Our AC LED Drivers are designed primarily for use with LED MR16 lamps. The RL-LED Series AC LED drivers have been optimized to work with a wide range of LED MR16 loads and are recommended by top lamp manufacturers. Unique features of the RL-LED drivers include small form factors and flicker-free dimming down to 0%.

LEDs are low voltage devices and require a power supply that converts line voltage (usually 120V to 277V) to low voltage to run the LEDs. The LED driver serves this purpose by feeding constant and efficient power to the LEDs.

  • Phase Dimming
    • There are two types of Phase Dimming: Leading Edge Dimming and Trailing Edge Dimming
    • Hatch LED drivers with a “P” in the part number after the current rating are compatible with both Leading Edge and Trailing Edge Phase Dimmers (i.e. LC25-0700P-120Q is a 700mA driver with Phase Dimming built in)
    • Leading Edge dimming is sometimes called Forward Phase or TRIAC dimming
    • Trailing Edge dimming is sometimes called Reverse Phase or Electronic Low Voltage Dimming.
    • There is a massive installed base of phase dimmers which is why they are so popular.
    • There are no additional wires on a Phase Dimming driver. The dimmer is wired in line with the input of the driver.
    • Phase dimming is only available in 120V input
  • 0-10V Dimming
    • This dimming type is used in most new construction and commercial applications.
    • Hatch LED drivers with a “Z” in the part number after the current rating are compatible with 0-10V dimmers (i.e. LC25-0700Z-UNV-Q is a 700mA driver with 0-10V dimming built in)
    • There are extra wires (usually grey and purple) on the driver that hook up to the 0-10V dimmer.
    • 9V is the maximum light level and 1V is the minimum light level.
    • 0-10V dimming is available in universal 120V-277V input.
Vf is short hand for “Forward Voltage”. Every LED has a specific forward voltage at which it turns on and emits its specified light output, assuming that it is drawing the recommended current. Each Hatch LED Driver has a set forward voltage range that can be found on the specification sheet.

An IP code, short for International Protection Marking, classifies and rates the degree of protection provided against intrusion of dust and water into an electrical enclosure. An example would be IP67. The first number, 6, denotes its dust protection rating. The second number, 7, denotes its water protection rating. A full list of the meaning of each code is shown below. UL does not recognize IP ratings and if a Hatch product does not have an IP rating on the specification sheet, it does not have an IP rating. In most instances, LED drivers do not require an IP rating because they are typically inside of a fixture, in which case the fixture would be IP rated and therefore the driver would be protected.

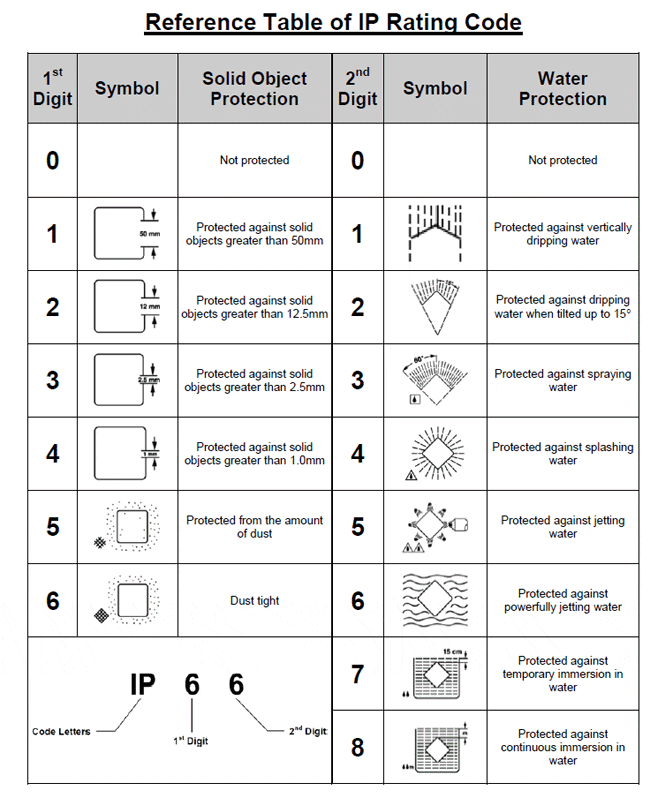
Yes. The maximum remote mounting distance is dependent on the LED load, the size of the conductor and the characteristics of the driver. Please confirm the application with your Hatch sales representative before making a purchase.

Surge Protection Device FAQs

The LSP10 model provides single-phase protection for Line/Neutral, Line/Ground and Neutral/Ground. The LSP4 provides protection for Line/Neutral, Neutral/Ground, Line/Ground and an additional level of protection for Line/Neutral. All Hatch surge protectors provide single-phase protection for any equipment connected to mains by providing transient suppression between Line/Neutral, Line/Ground and Neutral/Ground. Options are available for providing over-current protection and end-of-life indicators.

No. Only surge suppressors specifically intended for being wired ‘in series’ will turn the fixture off at end of life. Hatch’s LSP series of surge suppressors are not designed for and not intended to be wired in series. Instead, Hatch’s LSP3 series of surge suppressors is available in a model that has an end of life indicator LED that can be used to detect when it is time to be replaced, but in a typical parallel-application, power to the fixture will not be interrupted.

Hatch surge protectors use metal oxide varistors (MOV) as the primary surge protection technology. Metal oxide varistors protect downstream electronics by clamping overvoltage transients, dissipating the excessive energy in the transients in the MOV itself. The degradation and failure of a MOV is characterized by it conducting more and more current which in turn heats up the MOV. This eventually will result in over-current circuits engaging to interrupt current flow through the MOV.

Hatch surge protectors only have 3 wires, therefore can only be wired in parallel.

No. The universal input model will begin clamping immediately when connected to a 347V circuit and will continuously clamp until the surge protector is at end of life. The -480V model however can be used effectively on a 347V circuit and is recommended.

SnapLock™ is a method to easily mount the LSP10. The case is designed to securely mount into a ¾” standard electrical knockout. The mounting method provides easy installation without any tools.

Hatch Surge protectors are designed to protect all lighting fixtures including LED fixtures but they can also be used for all types of equipment connected to mains that is in need of transient protection.

The LSP3 and LSP10 series have built in over-current protection. The over-current protection is triggered when the surge protector begins to conduct at normal line voltage levels through the use of a thermal protection circuit. The LSP4 series does not have built in thermal protection. These surge protectors are intended for use in combination with properly rated overcurrent protection and in accordance with the intended application.

Electronic HID
Ballast FAQs

Hatch Metal Halide ballasts are designed to operate ceramic metal halide lamps and certain quartz lamps depending on ballast model. Please review the specifications and contact your local Hatch representative with further questions.

The T Point is the spot on the ballast that becomes hottest during normal operation. This is the point where thermal couples should bonded when performing a thermal test.

Yes, Hatch recommends remote mounting of pulse or probe start ballasts no further than 5 feet and HPS ballasts no further than 10 feet. This is because as lamps age and environmental conditions change, lamps may be more difficult to strike, resulting in performance problems.

CFL Ballast FAQs

No, Hatch electronic CFL ballasts will only operate 4-pin lamps.

The maximum design temperature that we recommend for our ballasts 70C at the T Point with a 25C ambient. If the expected application is in a high temperature environment, please contact Hatch for assistance in selecting an appropriate ballast.

A thermal couple should be bonded to points closest to the lamp and the “T” point. A 3-4 hour soak time should be allowed for the system to reach thermal equilibrium.

Ensure both red wires are connected individually to the same filament and both blue wires are connected individually to the other filament.

Hatch CFL ballasts will start at -25 degree C.

Transformer FAQs

In some cases Hatch halogen transformers can drive LED MR16 loads but Hatch does not warrant them for these applications. The reason for this is that the halogen transformers were designed long before LED MR16 designs emerged and they use a completely different topology/control circuit. The halogen transformers do not ‘self-oscillate’ – they depend on the impedance of the lamp itself to create a resonant circuit. LED MR16 lamps have their own mini-driver board in them so they do not present an appropriate impedance to the transformer. The LED version of the transformer overcomes this problem by using a special control integrated circuit that has a fixed oscillating frequency. Although this topology can be used to drive a halogen lamp, the reverse is not true. An RS-LED transformer should always be used if the load is intended to be a self-ballasted LED MR16 load.

A low voltage transformer is an electrical device that reduces 120 volts (line voltage) into 12 volts or 24 volts (low voltage). It is sometimes made by winding two wires around an iron core with one wire connected to the primary side (line voltage side) and the second wire connected to the secondary side (low voltage side). In the case of low voltage halogen or low voltage xenon lighting the low voltage transformer has an input or primary voltage of 120 volts (sometimes 277 volts) and an output or secondary voltage of 12 volts or 24 volts. An example of a core and coil type transformer is our LS and LT models.

Conventional low voltage transformers, also called magnetic core & coil low voltage transformers can be extremely large and heavy, consist of an iron core and two sets of wires as described in the previous paragraph. An electronic low voltage transformer, on the other hand, also contains an electronic device, called an inverter, which allows the size of the low voltage transformer to be substantially smaller. An inverter and a small transformer make up the main components of what we normally call an electronic low voltage transformer. An example of our electronic transformers is our RS and VS lines.

The inverter conditions the voltage to change direction at a frequency of about 20,000 times per second (called Hertz or Hz) as opposed to the normal power from your wall outlet, which changes direction at a frequency of 50Hz or 60Hz. The higher the frequency, the smaller the low voltage transformer can be. Most electronic low voltage transformers provide high frequency AC output.

Electronic low voltage transformers are very small and light compared to magnetic low voltage transformers, in most cases small enough that fixture manufacturers can often incorporate them within their lighting fixture rather than leaving the customer to find a hiding place. Even when not incorporated within the lighting fixture an electronic low voltage transformer is very easy to install in a small hidden location.

Simply – temperature rating. When size and weight are not an issue and a high temperature is needed, a magnetic transformer is a good choice. Hatch magnetic low voltage transformers can handle normal operating temperatures of 180 degree C.

Please make certain that the black and white input wires (primary side) of the low voltage transformer are connected to the power line (120 volts or 277 volts) using wire nuts that the two red output wires (secondary side) of the low voltage transformer are connected to the low-voltage light source using wire terminal blocks of appropriate size (for solid contact). Low voltage halogen or low voltage xenon lighting systems carry relatively large currents so all of the low voltage connections must be very tight to prevent arcing (a possible fire hazard) within those connections. Note: Do not connect 277 volts to a 120 volt transformer, and also do not connect 120 volts to a 277 volt transformer. Make sure you have the correct transformer that matches your input voltage.

(A) Please make certain that the black and white input wires (primary side) of the low voltage transformer are connected to the power line (120 volts or 277 volts) and that the two red output wires (secondary side) of the low voltage transformer are connected to the low voltage light source (12 volts or 24 volts). Most failures occur as a result of reverse or improper wiring.
(B) Check the filament of the lamp to see if is burned out. (Remember the glass envelope of a halogen lamp should NOT be touched by bare hands because the natural oil from your hands will cause the lamp to burn out prematurely.)
(C) Check the connection somewhere between the output wires of the transformer (red wires) and the lamp. The transformer has a sophisticated short circuit/overload protection system. If it senses a short or a bad connection or too many lamps (ie: too much wattage) it wil cause problems. Check all the connections for tightness, corrosion, arcing etc. If all are tight and clean and you do not have more than the maximum wattage of lamps on the system, then look at the lampholder itself. Make sure the contacts in the lampholder where the lamps plug in are still tight and do not show signs of carbon buildup or arcing.

Yes, they can be remote mounted up to 10 feet, after 10 feet there is a voltage drop of approximately .07 volts per foot.

No, some Hatch electronic transformers feature “Demand Circuit Design”. The transformer will not produce voltage unless a lamp with at least the minimum wattage required is connected to it.

Many models of Hatch low-voltage electronic transformers utilize a soft start circuitry to maximize lamp life. The soft start circuit ramps up the lamp filament voltage slowly when the lamp is cold.

You must use a digital volt meter capable of reading 25KHz or higher waveforms, we suggest a Fluke Model 5220A or equivalent.

This wire is only for OEM type applications. It is used to attach a 1 meg ohm linear taper potentiometer for dimming via a potentiometer. You do not have to use the blue loop to make the unit work, it is only there if you want to use a potentiometer to dim your fixture (example: Desk top lamp).